ArrowCreek Country Club (Legend Course) Detail
This writeup is from the "Rust" tees, which are only 6485 yards. While the "Steel" tees at 7042 may not sound too intimidating, bear in mind that there are some holes with very gnarly forced carries...
The first hole is by way of a warm-up, playing only 356 yards. While not too challenging distancewise, you need a bit of accuracy on your approach shot, to a green which is slightly elevated, and tucked back to the right behind some bunkers. Pretty start...
The second hole is a short par 3, playing only 131 yards. Be warned -- it's all carry, so you do need a quality shot!
#3 is a short par five, at 493 yards. It doglegs right, and you can cheat the corner if you hit it solid. If not, well, best to stay out in the middle of the fairway. Any decent midiron shot on your second shot sets you up for a good approach. If the pin is back right, don't go for it -- it's almost impossible to clear that bunker on the right. Play to the middle of the green for the best results here.
#4 is the first (of many) forced carry. The important thing with forced carries is not to swing any harder, but to hit the ball in the middle of the clubface. I know, I know, if you could do that, you wouldn't be a bogey golfer. Still, you don't need to kill it, you just need a solid hit. We're not playing from the back tees, after all. This is a long hole, at 430 yards. Plan on hitting a long iron for your approach.
#5 is 163 yard par 3, and while not overly long, presents a bit of a challenge. It's all forced carry over a chasm, and there is a steep bunker protecting the right front face. Stay committed to the shot, and aim a bit left.
#6 is another short par 5, playing only 482 yards. It is fiercely bunkered, so laying up to your favorite distance to pick your way in might be advisable (versus going for it and landing in one of the bunkers).
#7 is a 399 yard par 4. There's trouble both right and left, so it pays to be hitting a wedge or a short iron coming into this. So if you don't hit a solid drive, you might want to consider a layup to 50 or 60 yards.
#8 is a long par 3, at 197 yards. It's a bit downhill, which helps, and there's plenty of fairway short of the hole, although there's lots of junk to the right. So put an honest swing on it, and get as close as you can. The chipping approaches here are all pretty benign.
The ninth hole is a long par 5, playing 580 yards. The tee shot is a bit intimidating because of the both the angle and the forced carry. If you hit any kind of a fade at all, there's trouble galore in the form of a chasm on the right. There is a huge bunker on there to hopefully keep you in play, but mostly aim to the left half of the fairway. This hole also plays a bit downhill, which will help out. There is a chasm crossing the fairway about 100 yards from the hole that will definitely force you to lay up, if you weren't already planning on that anyway...
(By the way, #9 is nowhere near the clubhouse. To make a loop is the whole 18 holes.)
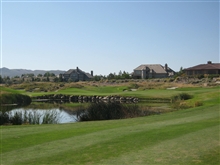
The tenth hole is a 395 yard par 4, which wraps around a lake. There's enough room to hit a good solid drive, which I suggest you do, because the shorter your second shot is, the happier you'll be! Be mindful that if you pull your second shot, that lake goes back an awfully long ways...
#11 is only 407 yards (only!), but it has a very intimidating tee shot. Your landing area is the flat spot in the middle. From there the fairway doglegs right down the hill, and the par shooters are going to try and cut that corner. For me, it's a good way to make a 7 -- hit it straight and be happy!
#12 is a short par 3, playing 132 yards. However, it has a forced carry, and bunkers everywhere. It really makes you pay attention and hit a quality shot, despite being the easiest-rated hole on the course!
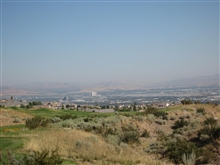
#13 is what baseball players would refer to as "a long slow curve with a fast break"... The fairway is plenty generous to let you go after it with your driver, but the green is set up right against a chasm. Accuracy is at a premium on your second shot.
#14 is a 508 yard par five, that's downhill to boot. The fairway slopes right, so hit it left to ensure you stay in play. There is plenty of trouble to be had around the green, so make sure you confidence is up to the test if you're in position to try and reach it in two.
#15 is a huge par 3 over a massive chasm running from left to right toward the hole. The trick here is to a) get across the junk, and b) get onto the green. Don't feel like you have to both of these in the same shot. This is one of the harder holes on the course, and bogey is a great score.
#16 is another short par five, playing 485 yards. It doglegs around a rock outcropping on the right, and negotiating that turn can cost you some distance. Take what the course gives you, and don't be greedy!
#17 is a very short par 4, at just 270 yards. Hit an iron off the tee and keep the ball in play (yes, I hit driver and lost it in the weeds right).
The home hole is a long par 4 (421 yards). The trick (as with most long par 4s) is to get a really good drive, so that you're only hitting a mid iron across the junk in front of the green. Be mindful that the chasm runs diagonally away from you from left to right. So if the pin is back right, be sure to take an extra club, maybe two!
#13 |